The ZSS Dev Center offers a variety of downloads and resources. This guide focuses on what you need to get started and walks through the basics for running your first Zumero for SQL Server test.
thumb_upGet Ready
Make sure you have a few key pieces of information and architecture.
ZSS Server will help you sync with your SQL Server database, via an Internet Information Server (IIS) installation. ZSS Manager will prepare your database for syncing.
Here's what you'll need to get started:
- A SQL Server installation.
- A Database on that SQL Server, containing your data and (soon) your Zumero metadata.
- A SQL Server Login (or two), with permission to: read & write data, create & modify views, and view server state. This may be a SQL Server account, or a trusted Windows account. You'll need a set of credentials to prepare the database for synchronization, and a set that Zumero Server will use when syncing your data. These may be the same credentials, but they don't need to be.
- An IIS machine on which you can install IIS components, and (optionally) configure IIS settings. Zumero Server will run here.
- A Free Trial License Key which allows you to give Zumero for SQL Server a test run. Available here.
- A Development Machine on which to run ZSS Manager. The SQL Server, IIS, and Development machines may be separate; alternatively, some or all of them may be the same machine.
storagePrepare Your Database
Prepare your database for Zumero usage. ZSS Manager takes care of the heavy lifting for you.
Install ZSS Manager
If you haven't already done so, download and install ZSS Manager from the ZSS Dev Center.
ZSS Manager can run on a developer's desktop, or on any other (Windows 7 or later) machine with network access to the SQL Server database and (later) the IIS Server hosting Zumero.
Connect to SQL Server
From Windows' "Start" or "Search", launch ZSS Manager and enter the name or address of your SQL Server.
You'll need to choose an authentication method: "SQL Server Authentication" if you'll be using a username/password specific to your SQL Server database. The FAQ explains how to create a new SQL Server user if you don't have one suitable for Zumero's use.
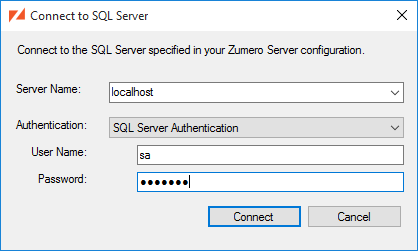
You may wish to try connecting with SQL Server Management Studio first, using the same credentials. If the connection fails there, check with your DBA or sysadmin to confirm the proper login details.
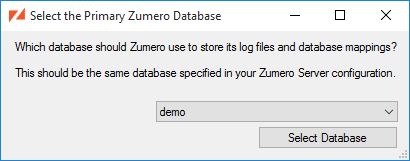
Choose a database
Select the database you want to prepare for use with Zumero from the database drop-down:
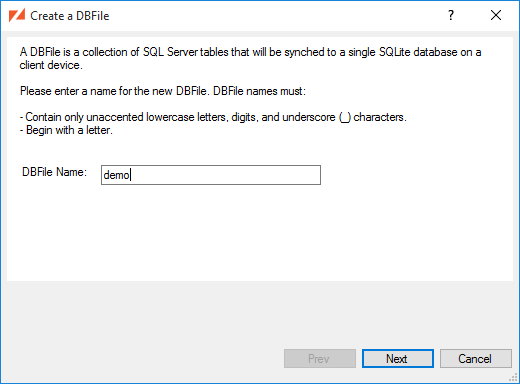
Create a DBFile
Zumero's "unit of synchronization" is the DBFile: a container for tables which will be synced together. On the mobile side, a DBFile corresponds to a single local database. DBFiles are defined on the Server end, where they are built from tables within your database. See the DBFiles section of the ZSS Manager User Guide for more details.
We must create at least one DBFile before we can sync with a Zumero server. ZSS Manager lets you create, and populate, that DBFile.
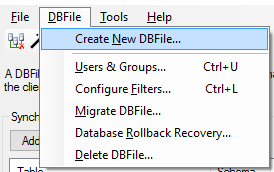
In the lower left corner, the status bar tells us the first thing we need to do: create a DBFile. So let's do that.
Select Create a DBFile... from the DBFiles menu
Now choose a name for our DBFile:
Select the database which contains our tables:
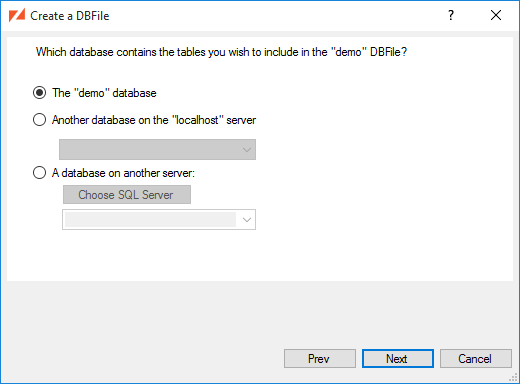
And Create the DBFile.
Set Permissions
Now that we have a DBFile, the (Users & Groups) button is enabled. Click it to manage users and set permissions.
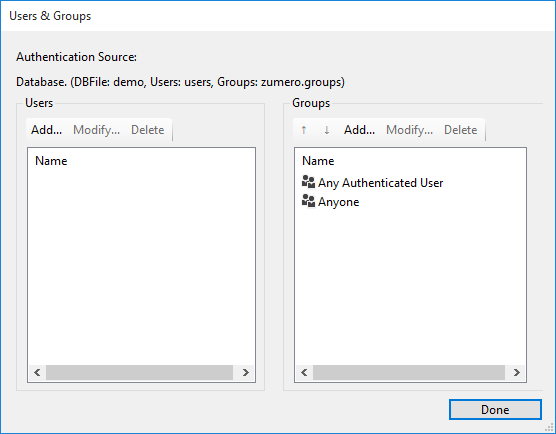
The first time you access User Management for a given SQL Server database, you'll be prompted to create the users table. Click to continue.
Here we simply allow full access to everything, by anyone. For details on setting up realistic users and permissions, see the ZSS Manager Users Guide.
To get us up and running quickly, we double-click the "Anyone" user and set all 4 permissions to Allow:
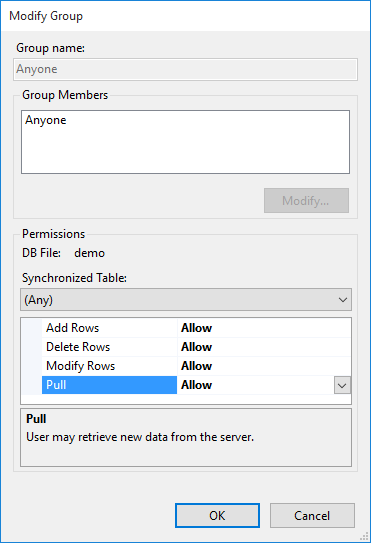
Thus relieving us of the need to provide any user credentials to Zumero when syncing. Expedient, but not terribly secure. Visit the ZSS Manager Users Guide later to learn how to do things properly.
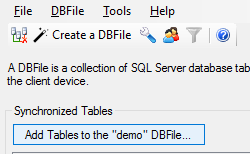
Add a Table to the DBFile
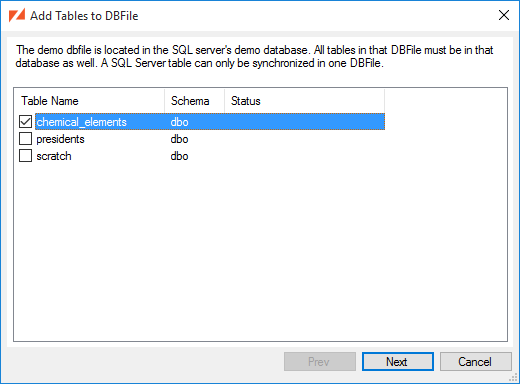
In the main window, click the button to select the tables that you want to synchronize.
Select the checkbox beside each of the tables that you want to add to the DBFile.
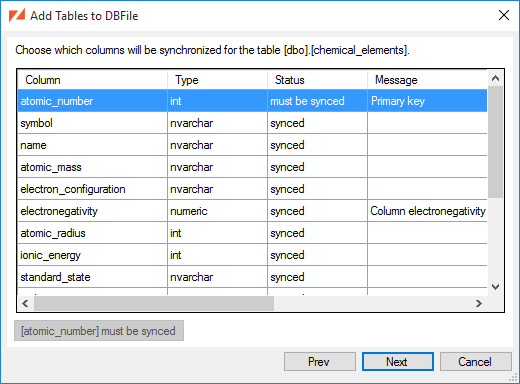
For each table that you have selected to add, you will be presented with a page to select which columns will be synced to the client.
When it does make it to the mobile side, the database will contain
the chemical_elements table, with all its rows and columns. If we added more tables, they
would come along too - with foreign key relations intact.
We want to try to synch this DBFile now; but we need to get Zumero Server up and running first.
settingsConfigure Zumero Server
Sync the tables you've prepared.
On the machine where IIS lives, download and run the ZSS Server Installer from the ZSS Dev Center.
The Server Configuration tool will prompt you to enter your license key.
Next, you need the connection string Zumero will use to talk to SQL Server, including the name of the sync database and any necessary credentials.
The ZSS Server Installation guide has more details, but this should be a string of the form:
Driver={SQL Server Native Client 11.0};Server={your.server.address};Database={database};UID={SQLUSER};PWD={SQLPASS};
if you're using SQL Authentication, or
Driver={SQL Server Native Client 11.0};Server={your.server.address};Database={database};Trusted_Connection={yes};
for Windows Authentication.
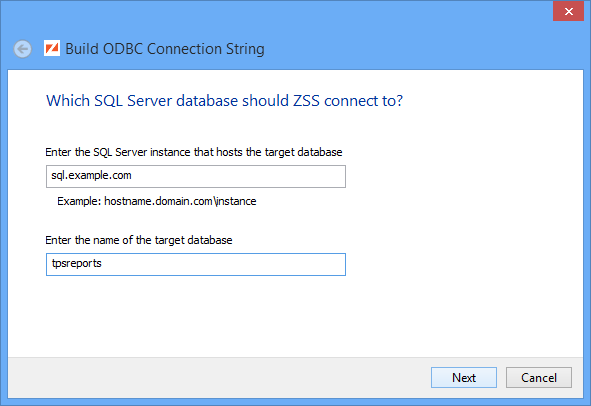
The button opens the Connection String Builder, which will prompt you for your connection details, and create the final connection string for you.
Begin by entering your server's name (and optional instance name), and the name of the database to which ZSS will connect:
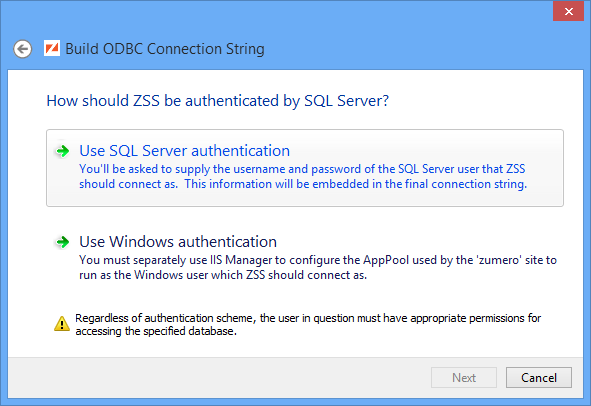
Then choose your authentication type. At the moment, we're choosing SQL Authentication:
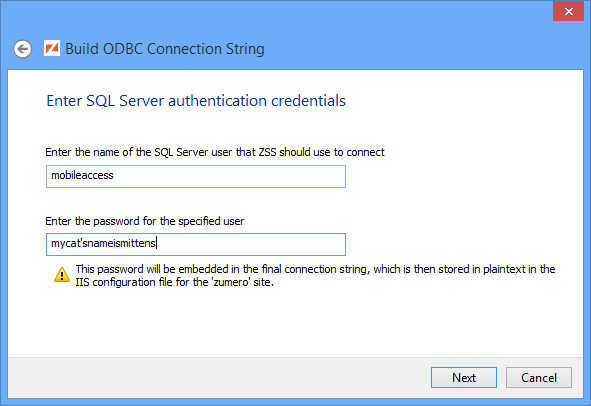
Enter the appropriate username and password:
After reviewing the final connection string, it's added to the main setup form:
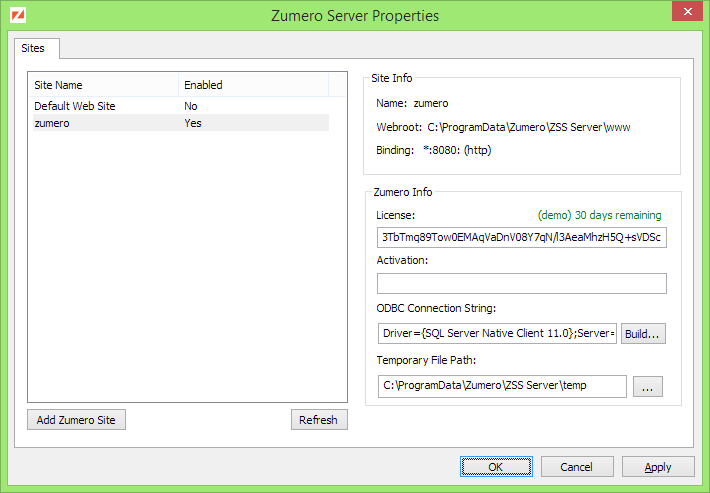
Advanced Settings
The installer will try to choose a reasonable temporary directory for ZSS Server's use, but you are free to choose another. The directory must be writable by the account under which the Zumero site runs.
Using Windows Authentication (Optional)
You may have chosen Trusted/Windows authentication, rather than adding users to SQL Server itself. If so,
you'll need to see that ZSS Server runs as a user with sufficient privileges. The place to set that user is
on the IIS Application Pool under which ZSS Server runs. Launch Internet Information Services (IIS) Manager, and click on "Application Pools" under your server in the left-hand list. You'll see
a zumero pool listed.
By default, the "Identity" column for this pool will be one of the built-in identities, typically "ApplicationPoolId". To change it to a user with access to your SQL Server database, right-click the
row containing the zumero pool, and select "Advanced Settings..." from the pop-up menu:
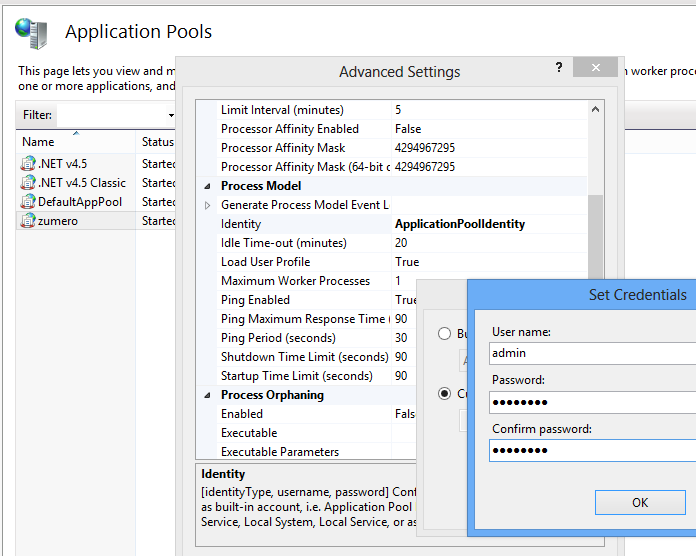
Scroll down to the Process Model section and select the Identity row.
Click the button to the right of the current identity, then choose "Custom Account", and click "Set...".
Fill in the appropriate Windows user and password (twice), then OK your way out of the dialogs.
Now Stop then Start the pool under "Application Pool Tasks" to resume ZSS Server
under the new credentials.
verifiedUsing the Test Client
Confirm that everything's working nicely.
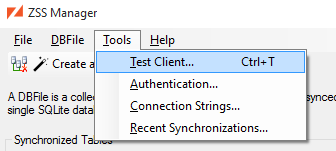
Now that ZSS Server is up and running, we can use ZSS Manager's Test Client to check our connection.
Select "Test Client" from ZSS Manager's "Tools" menu.
Click the Sync button, and we're asked to connect to a ZSS Server.
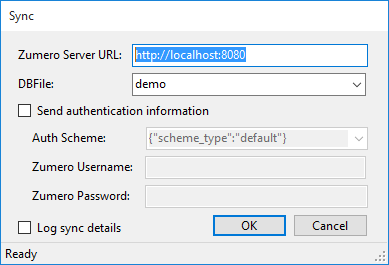
These answers should all be familiar now:
- Server URL: the address of your IIS Server from the previous step, plus the port number you configured.
- DBFile: the name of the DBFile we created with ZSS Manager earlier - "demo" in our example above.
- Send authentication information: leave this unchecked, since we allowed anonymous access when we set up our DBFile.
After you click , the client will take a moment to actually sync your data; a copy of all the DBFile's data will be available to the client as a local SQLite database. The Test Client (like your future apps) can read, add, modify, and delete the data in these tables at will. When we're ready, we'll sync with ZSS Server again - sending up our changes, and collecting anything new that's happened while we were away. The Troubleshooting section of the ZSS Manager guide offers guidance if your sync does not go as expected.
Let's make a change to the data that was pulled down:
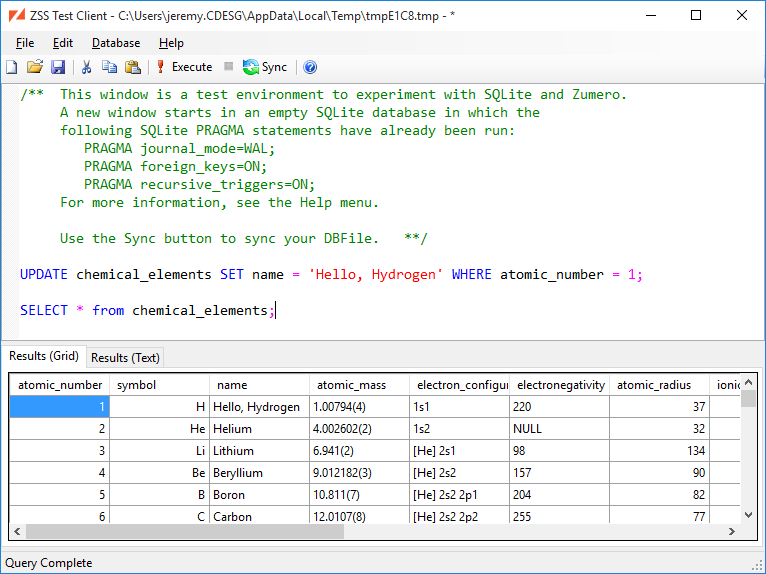
When we sync again, that new name will be seen in the SQL Server data, as well.

devicesBuild
Using Zumero in Your App.
Syncing from the test client is nice, but what about getting that same data synced into your own app?
The ZSS Client SDK contains an iOS Framework for Zumero sync.
Drag Zumero.framework from the SDK into your iOS Xcode project's Frameworks list,
and syncing our example DBFile looks like this:
    #import <ZumeroSync /ZumeroSync.h>

    // ...

    - (void) mySyncMethod
    {
        // local SQLite db file
        // doesn't need to exist yet
        NSString *myDbName = @"/path/to/local/sqlite.db";

        // DBFile name on the server
        NSString *dbFileName = @"test";
        NSError *err = nil;

        [ZumeroSync Sync:myDbName
        cipherKey:nil
        serverUrl:@"http://MY_ZUMERO_SERVER:8080"
        remote:dbFileName
        authScheme:nil
        user:nil
        password:nil
        error:&err];

        // we now have a local copy of the DBFile at `myDbName`
        // modify as we like, then sync again
    }
See ios/zumero_sync.pdf in the ZSS Client SDK
for more information on the ZumeroSync functions.
Copy all the files from the ZSS Client SDK
android/libs folder into your application's libs, and on a background
thread, call:
        import com.zumero.ZumeroClient;

        // ...

        ZumeroClient.sync(
        context,            // e.g. the current Activity
        local_db_pathname,  // full path to local db file
        null,
        "http://MY_ZUMERO_SERVER:8080",
        "test",             // remote DBFile name
        null, null, null);  // anonymous auth

        // we now have a local copy of the DBFile
        // at `local_db_pathname`.
        // modify as we like, then sync again
...or open the Sync Android sample app in the SDK.
Follow the instructions in winrt/README.txt (in the ZSS Client SDK) to include the ZSS libraries in your project. Then call:
        using Zumero;

        // ...

        ZumeroClient.Sync(
        "/path/to/sqlite.db",   // full path to local db file
        null,
        "http://MY_ZUMERO_SERVER:8080",
        "test",                 // remote DBFile name
        null,
        null,
        null);

        // we now have a local copy of the DBFile
        // at `/path/to/sqlite.db`.
        // modify as we like, then sync again
... or open one of the several WinRT sample apps in the SDK.
Follow the instructions in maui/README.txt
(in the ZSS Client SDK) to include the ZSS libraries in your project. Then, on a background thread, call:
        using Zumero;

        ZumeroClient.Sync(
          "/path/to/sqlite.db", // full path to local db file
          null,
          "http://MY_ZUMERO_SERVER:8080",
          "test",  //remote DBFile name
          null, null, null);

        // we now have a local copy of the DBFile
        // at `/path/to/sqlite.db`.
        // modify as we like, then sync again